Nowadays, and thanks to the INSPIRE directive, we have at our disposal a huge amount of resources for downloading satellite images and all kinds of geographic information. This comes through the several services that make available to the public the different entities through Spatial Data Infraestructures (SDI). This data is not only made publicly available for free consultation and download, but also efforts are made to ensure the access to this information is standardised. This standardised process makes it easier for us to automate works and tasks.
Many times, when we need satellite images, we don’t need only one, or the one we want is of such a size that the servers do not offer us the possibility of accessing such large downloads. In this second case, we proceed to download a mosaic of several images of the same size.
SDI servers put at our disposal two Http request methods (HttpGet and HttpPost). For an easy automate download of the data, we’ll use the first one. HttpGet requets allows us to add parameters to the url, shaping what is known as uri. For that, after the url adress, the beginning of the request chain is marked with a question mark (“?”) and it shows pairs of data name and value separated by an “=”, separating each pair of data name and value from the next by an “&”. This allows, for example, a JavaScript script to incorporate as variables the data of the parameters added to the url. For exqmple, if we want to know which layers a WMS service has, we can perform a HttpGet request to the SDI server of the city of Munich, to tell us what services it offers through the GetCapabilities request.
URL:
https://geoportal.muenchen.de/geoserver/gsm/wms?
Request chain:
SERVICE=WMS&REQUEST=GetCapabilities
URI:
https://geoportal.muenchen.de/geoserver/gsm/wms?SERVICE=WMS&REQUEST=GetCapabilities
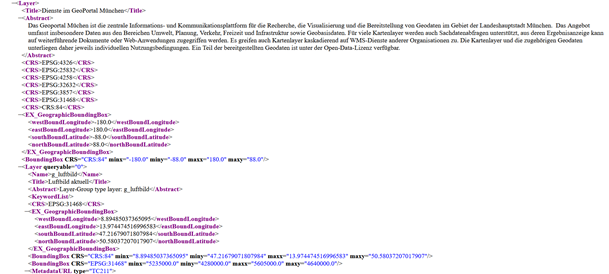
As a result, it will give us a XML document with information about the service and the data at our disposal. Among these data are the layers and their names, available coordinate systems, layer boundaries and resolutions, etc.
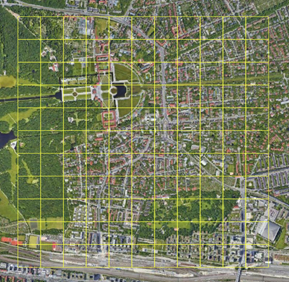
We can extract from this XML all the necessary data to perform a GetMap request to the server to give us back a raster with the desired image. We could get a square image of one thousand pixels on each side of the 200×200 metre squares shown in the previous image through the following HttpGet request:
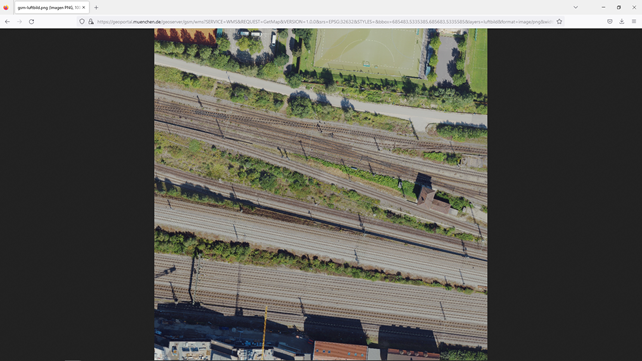
https://geoportal.muenchen.de/geoserver/gsm/wms?SERVICE=WMS&REQUEST=GetMap&VERSION=1.0.0&srs=EPSG:32632&STYLES=&bbox=685483,5335385,685683,5335585&layers=luftbild&format=image/png&width=1000&height=1000
This request incorporates the following parameters: service type (SERVICE=WMS), request (REQUEST=GetMap), version (VERSION=1.0.0), reference system (srs=EPSG:32632), boundary coordinates of the image to be downloaded (bbox=685483,5335385,685683,5335585), name of the layer (layers=luftbild), format in which the image is downloaded (format=image/png) and number of pixels in width and height that the downloaded image will have (width=1000&height=1000). This 200×200 square over the terrain and of a thousand pixels on a side, will give us the same pixel size as the original orthophoto (20cm). If the request is well-formulated, the browser will open it for us directly, and if not, it will download a text file containing an error message.
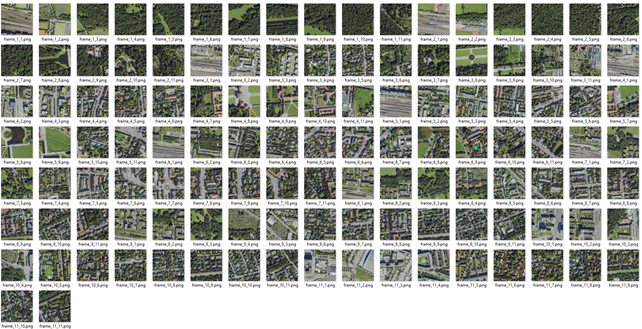
We can see that performing a request to get a single image is relatively simple, but we can realise that if we want to do this by hand to obtain all the images corresponding to the 121 boxes shown before, it would be a titanic task. Let alone if we were to go into larger numbers.
To make this task accessible and that the number should not matter, we will prepare with Python a small script that will download for us all these images to the desired folder and that will distinguish each of them in its file name according to its position in the downloaded grid.
We will use the “request” and “time” libraries to perform the requests and to manage the time these are made, in order to avoid that, if we make too many requests in a very short space of time, our requests are detected as an attack to the server. We will also choose the destination folder for our orthophotos.

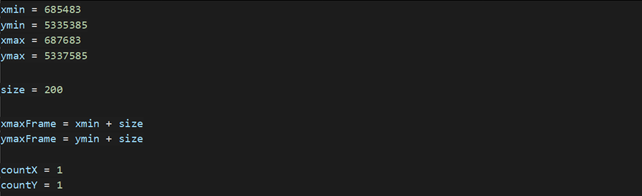
Then, we introduce the maximum and minimum coordinates of all the surface area from which we want to download and the size in metres of the side of the square of the “patches” we are going to download. With them, we would obtain the boundary coordinates of the first frame to download, adding the side to the minimum x and y coordinates, also starting the counter that will give us the position of each image within the grid, in this case, being the first one, it will have the position 1.1.
We will now create a loop that will first iterate through the frames along the X axis until the maximum X of the frames to be downloaded, passing at each X stop through another loop that will iterate through all the contained frames between the minimum and maximum values for the Y coordinates.
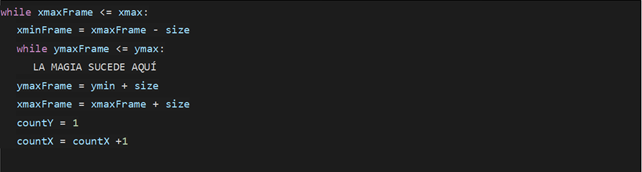
While the X loop is dedicated to update the counters and coordinates at the end of every loop over the Y axis, it is the last one that will stop individually on each square from which we will request a download. This is why this second loop will contain, in addition to the update of the coordinates and counters corresponding to each Y coordinate stop, all the code corresponding to complete the request to the server. Here is where the “magic” happens.
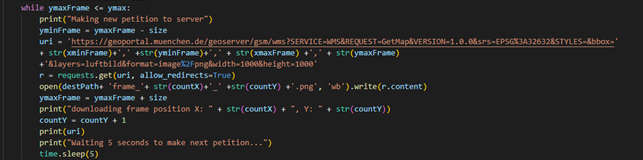
As you can see, this “magic” has little magic and it’s not even very complex. What it does is to locate for each request the maximum and minimum X and Y coordinates for each “patch” and create the name of the file using the repetition counter of each “countx” and “county” loop. Besides that, we included a “print” so it shows us the progress of the script execution, and after every download request we wait 5 seconds to request the next one, so we can avoid being banned over too many simultaneous requests. Without this 5-seconds wait, with much lesser number we would still be excluded.
Now we could, for example, integrate these images in a supervised training session creating masks on the same place and extracting the analogue coordinate patches. If we want to rebuild a bigger image joining all the downloaded images, we should follow the procedure “unpatchify” described in this post:
División de Imágenes en Python con Patchify.
Original post:
Descarga multiple de imagenes de satelite gratuitas con Python.


 (3 votes, average: 2.33 de 5)
![]() Loading...
Loading...


Leave A Comment